PostgreSQL Onboarding
How to connect to my PostgreSQL instance ?
Once Postgres single or Flexible server is deployed, you are able to connect with either your personal Thales account or the group name for multiple administrators. those account are used for administration purpose, we recommend to not use them for regular database operations.
In order to connect your application to PostgreSQL, we need to create an internal PostgreSQL account
Step 1 - Create an internal account using psql command line
In this part, we :
- Connect to database using your Azure identity
- Create a user
- Create a database
- Grant the user to the database
Prerequisites :
- AZ cli
- Postgres client (psql)
- PostgreSQL name (specified in delivery mail)
First, you need to retrieve an unique token corresponding to your Azure identity.
There's the corresponding authentication scenario :
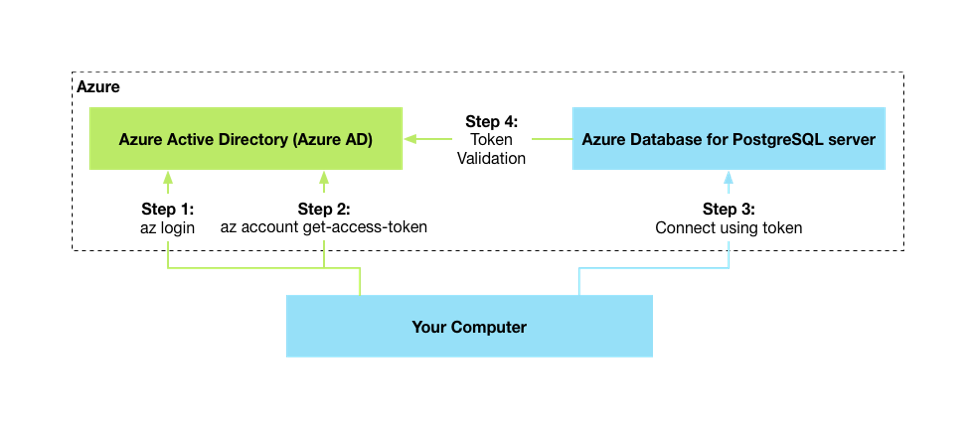
- Flexible Server
- Single Server (DEPRECATED)
Log in to azure:
az login
Set your tenant name and pg host:
export TENANT_NAME=<YOUR_TENANT_NAME> # ex: yourproject-sandbox
export FLEXIBLE_INDEX=1 # Updatewith you flexible database name
export PG_HOST="dbaas-${TENANT_NAME}-psql-flex${FLEXIBLE_INDEX}"

echo "$PG_HOST"
# dbaas-yourproject-sandbox-psql-flex1
Connect with psql:
# PostgreSQL host as specified in mail"
#FLEX
export PG_URL="${PG_HOST}.postgres.database.azure.com"

#Use the group name as user
export PG_USER="dbaas-${TENANT_NAME}-psq-flex${FLEXIBLE_INDEX}-aadadmins"
export PGPASSWORD=$(az account get-access-token --resource-type oss-rdbms --query accessToken -o tsv)

psql "host=${PG_URL} \
      user=${PG_USER} \
      dbname=postgres sslmode=require"
az login

# PostgreSQL host as specified in mail"
export PG_HOST="dbaas-Tenant_name-psq1"

export PG_URL="${PG_HOST}.postgres.database.azure.com"
export PG_USER="sqladadmin@${PG_HOST}"
export PGPASSWORD=$(az account get-access-token --resource-type oss-rdbms --query accessToken -o tsv)

 psql "host=${PG_URL} \
       user=${PG_USER} \
       dbname=postgres sslmode=require"
A psql shell should open, connected on database
With psql open:
Create a database named "mydatabase":
CREATE DATABASE mydatabase;
Create an user
CREATE USER mydatabaseuser WITH ENCRYPTED PASSWORD 'acomplexpassword';
Grant access to database
GRANT ALL PRIVILEGES ON DATABASE mydatabase TO mydatabaseuser;
You now have a new database with a user granted on it !!!
Exit your psql shell:
exit
Next steps :
Step 2 - Connect an application to your database
In this step, we'll start a REALLY simple application connected to your PostgreSQL database created in Step 1
This example is based on this nodeJS application : TomFern/dockerizing-nodejs It uses node postgresql driver and Sequelize ORM
The application creates a People table and expose a REST api
Without Docker
Prerequisites :
- npm
- Flexible Server
- Single Server
git clone  https://github.com/TomFern/dockerizing-nodejs.git
cd dockerizing-nodejs/src
export PG_HOST="dbaas-${TENANT_NAME}-psql-flex${FLEXIBLE_INDEX}" ### As delivered by mail
export DB_HOST="${PG_HOST}.postgres.database.azure.com"
export DB_SCHEMA="mydatabase"         # Created in step 1
## Note: Please notice the user@host user
export DB_USER="mydatabaseuser"
export DB_PASSWORD="acomplexpassword" # Create in step 1
## This parameter is not documented in the github, but mandatory for us
export DB_SSL="true"

## install dependencies
yarn install

## Now we can launch the migration task which will create People table
npm run migrate

#Executing (default): CREATE TABLE IF NOT EXISTS "People" ("id"   SERIAL , "firstName" VARCHAR(255) NOT NULL, "lastName" VARCHAR(255)
# ...
You can validate the table creation with psql as configured in step 1
postgres-> \c mydatabase You are now connected to database "mydatabase" as user "dbaas-project-sandbox-psq-flex1-aadadmins". mydatabase-> \dt List of relations Schema | Name | Type | Owner --------+--------+-------+---------------- public | People | table | mydatabaseuser (1 row)
Then we can start the application in the same window where you define your variables:
npm start
## The application expose an api on localhost:3000
Your application is now running, don't close the shell !
In another shell, start adding a user using the api :
curl -w "\n" \
       -X PUT \
       -d "firstName=Tom&lastName=Sawyer" \
       localhost:3000/persons
Tom's contact should have been created :
curl -w "\n" localhost:3000/persons/all
#[
#    {
#        "id": 3,
#        "firstName": "Tom",
#        "lastName": "Sawyer",
#        "createdAt": "2022-07-05T22:54:00.448Z",
#        "updatedAt": "2022-07-05T23:54:00.448Z"
#    }
#]
Using psql , we can see entries in Persons table :
#FLEX
export PG_URL="${PG_HOST}.postgres.database.azure.com"

#Use the group name as user
export PG_USER="mydatabaseuser"
export PGPASSWORD="acomplexpassword"

psql "host=${PG_URL} \
      user=${PG_USER} \
      dbname=postgres sslmode=require"
postgres=> \c mydatabase
psql (15.3, server 13.10)
SSL connection (protocol: TLSv1.3, cipher: TLS_AES_256_GCM_SHA384, compression: off)
You are now connected to database "mydatabase" as user "mydatabaseuser".


mydatabase=> select * from "People"
mydatabase-> ;
 id | firstName | lastName |         createdAt          |         updatedAt
----+-----------+----------+----------------------------+----------------------------
  1 | Bobbie    | Draper   | 2022-07-05 22:55:42.381+00 | 2022-07-05 22:55:42.381+00
  2 | Bobbie    | Draper   | 2022-07-05 22:57:32.061+00 | 2022-07-05 22:57:32.061+00
  3 | Tom       | Sawyer   | 2022-07-05 23:00:54.113+00 | 2022-07-05 23:00:54.113+00
git clone  https://github.com/TomFern/dockerizing-nodejs.git
cd addressbook
export PG_HOST="dbaas-Tenant-Name-psq1" ### As delivered by mail
export DB_HOST="${PG_HOST}.postgres.database.azure.com"
export DB_SCHEMA="mydatabase"         # Created in step 1
## Note: Please notice the user@host user
export DB_USER="mydatabaseuser@${PG_HOST}"
export DB_PASSWORD="acomplexpassword" # Create in step 1
## This parameter is not documented in the github, but mandatory for us
export DB_SSL="true"

## Now we can launch the migration task which will create People table
npm run migrate

#Executing (default): CREATE TABLE IF NOT EXISTS "People" ("id"   SERIAL , "firstName" VARCHAR(255) NOT NULL, "lastName" VARCHAR(255)
# ...
You can validate the table creation with psql as configured in step 1
postgres-> \c mydatabase You are now connected to database "mydatabase" as user "sqladadmin@dbaas-xxxx-xxxx-psq1". mydatabase-> \dt List of relations Schema | Name | Type | Owner --------+--------+-------+---------------- public | People | table | mydatabaseuser (1 row)
Then we can start the application :
npm start
## The application expose an api on localhost:3000
And start adding a user using the api :
curl -w "\n" \
       -X PUT \
       -d "firstName=Tom&lastName=Sawyer" \
       localhost:3000/persons
Tom's contact should have been created :
curl -w "\n" localhost:3000/persons/all
[
    {
        "id": 3,
        "firstName": "Tom",
        "lastName": "Sawyer",
        "createdAt": "2022-07-05T22:54:00.448Z",
        "updatedAt": "2022-07-05T23:54:00.448Z"
    }
]
Using psql , we can see entries in Persons table :
mydatabase=> select * from "People";
 id | firstName | lastName |         createdAt          |         updatedAt
----+-----------+----------+----------------------------+----------------------------
  1 | Bobbie    | Draper   | 2022-07-05 22:55:42.381+00 | 2022-07-05 22:55:42.381+00
  2 | Bobbie    | Draper   | 2022-07-05 22:57:32.061+00 | 2022-07-05 22:57:32.061+00
  3 | Tom       | Sawyer   | 2022-07-05 23:00:54.113+00 | 2022-07-05 23:00:54.113+00
With Docker
git clone  https://github.com/TomFern/dockerizing-nodejs.git
cd applications
 docker build -t addressbook .
docker run -it -p 3000:3000 addressbook
All others steps remains the same as without Docker
Step 3 - Use pgAdmin to operate your database
pgAdmin is a popular administration and development tool for postgreSQL.
At DBaas, we host a pgAdmin instance (on a Kaas Cluster ;) )
First , you need to fetch an unique token (as already seen in part 1)
Retrieve token
az login
az account get-access-token --resource-type oss-rdbms --query accessToken -o tsv
## Please copy your token to your clipboard - we'll use it in the next steps
Connect to pgAdmin :
PROD : https://pgadmin.prod.dbaas.thalesdigital.io/browser/
Then Login with Thales Azure AD authentication
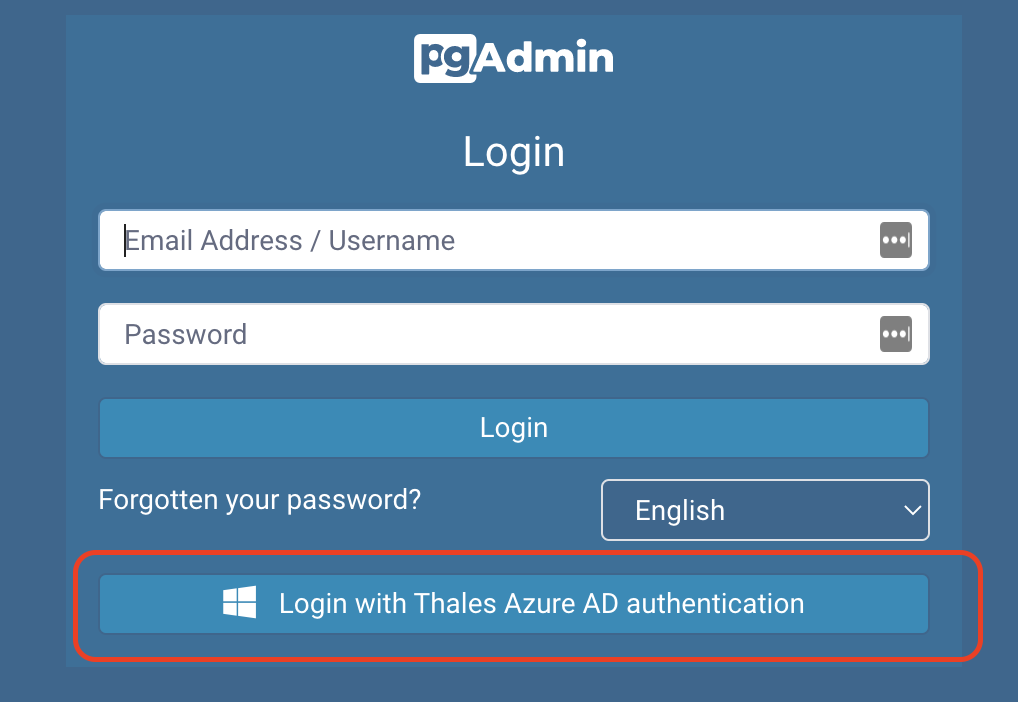
Then right click on Servers > Register > Server

In General tab :
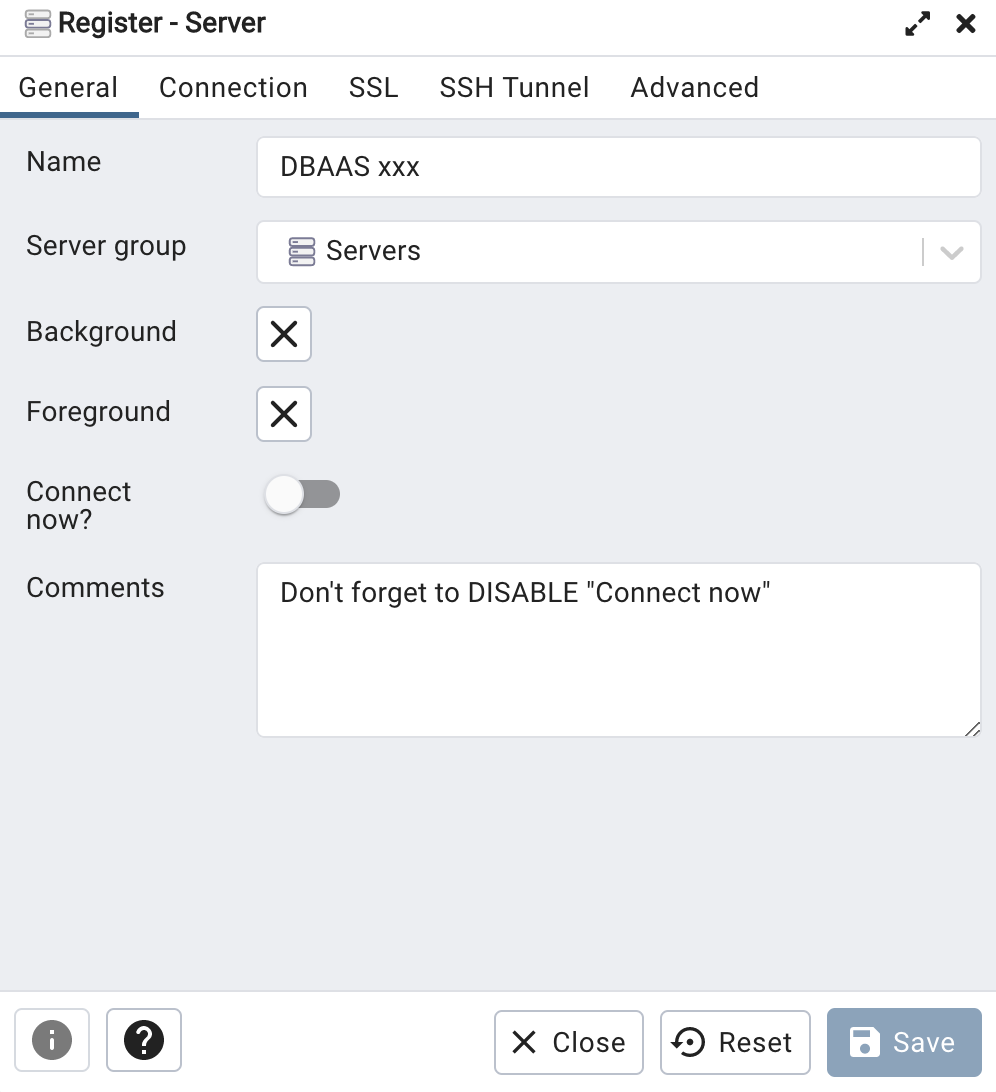
Name your server in Name: field (Ex: Dbaas test)
Disable Connect now option
IMPORTANT ! You have to turn off Connect now Option
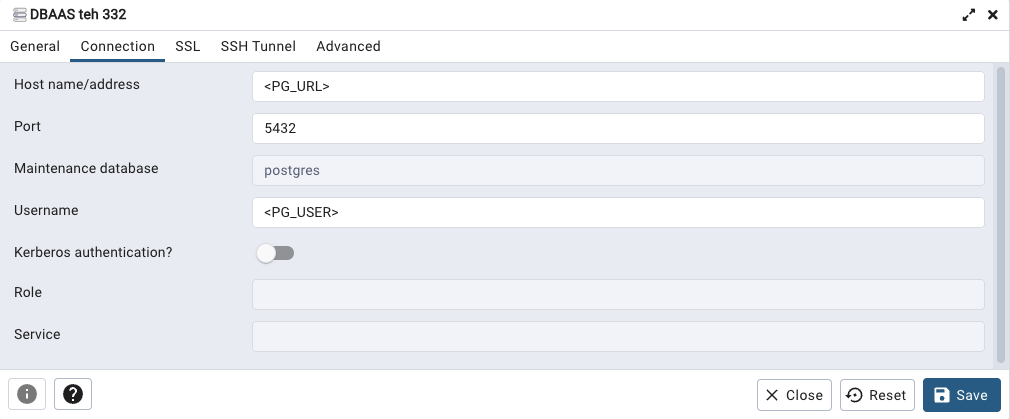
In Connection tab:
- Flexible Server
- Single Server
Note down your hostname using the env variable:
echo "$PG_URL"
# dbaas-<TENANT_NAME-ENV>-psql-flex<FLEXIBLE_INDEX>.postgres.database.azure.com
echo "$PG_USER"
# dbaas-<TENANT_NAME-ENV>-psq-flex<FLEXIBLE_INDEX>-aadadmins
To be sure your Group exist you can use these command from the az cli:
az ad group show --group dbaas-<TENANT_NAME-ENV>-**psq**-flex1-aadadmins
e.g. : az ad group show --group dbaas-jiraavs-sandbox-psq-flex1-aadadmins
If the group doesn't exist you should get this error message:
No group matches the name of 'dbaas-jiraavs-sandbox-psql-flex1-aadadmins'
Use these variables to register in the "Connection Tab":
In SSL Tab
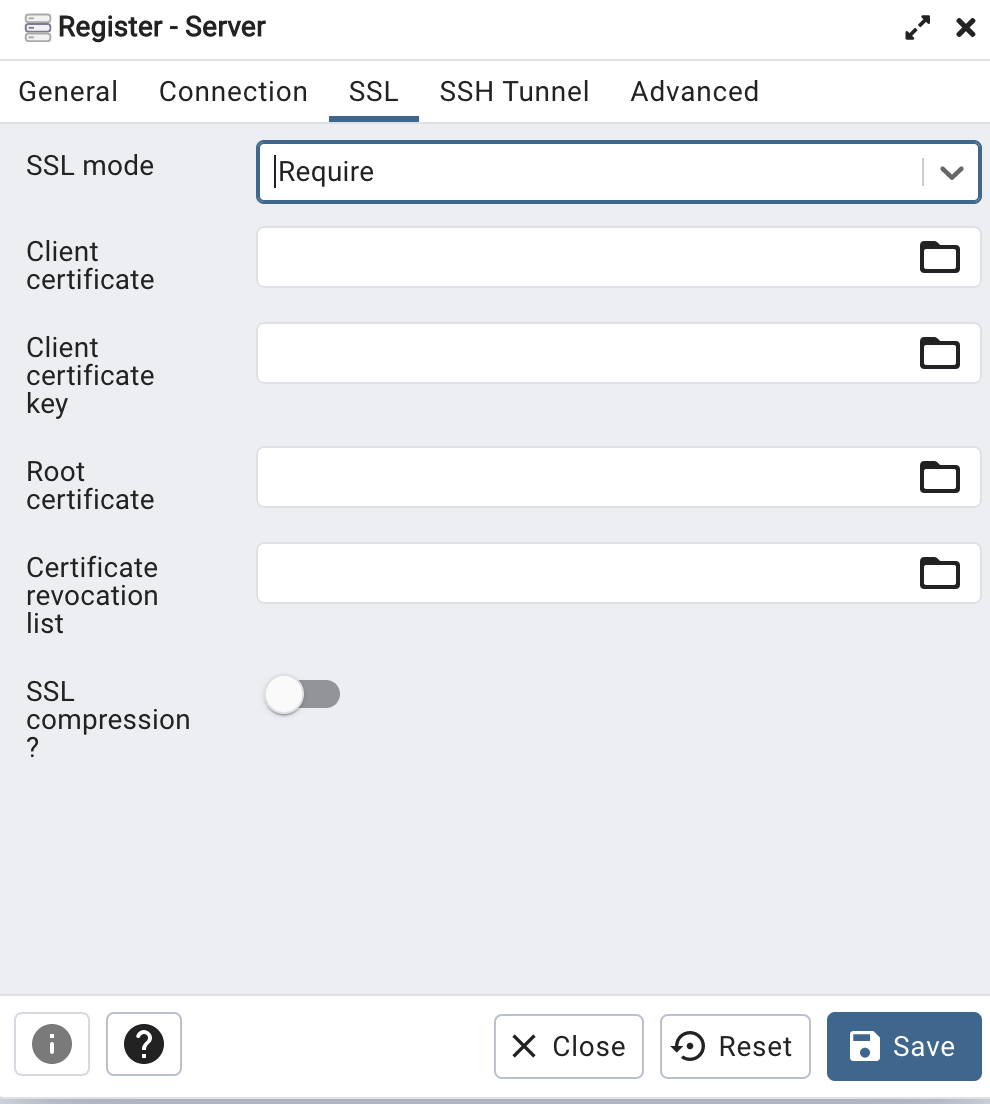
SSL option MUST be "Required"
Then save your Server configuration
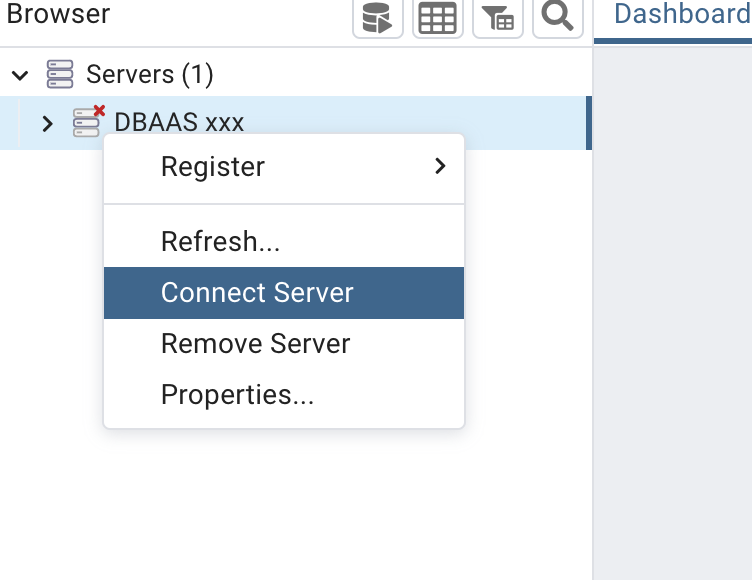
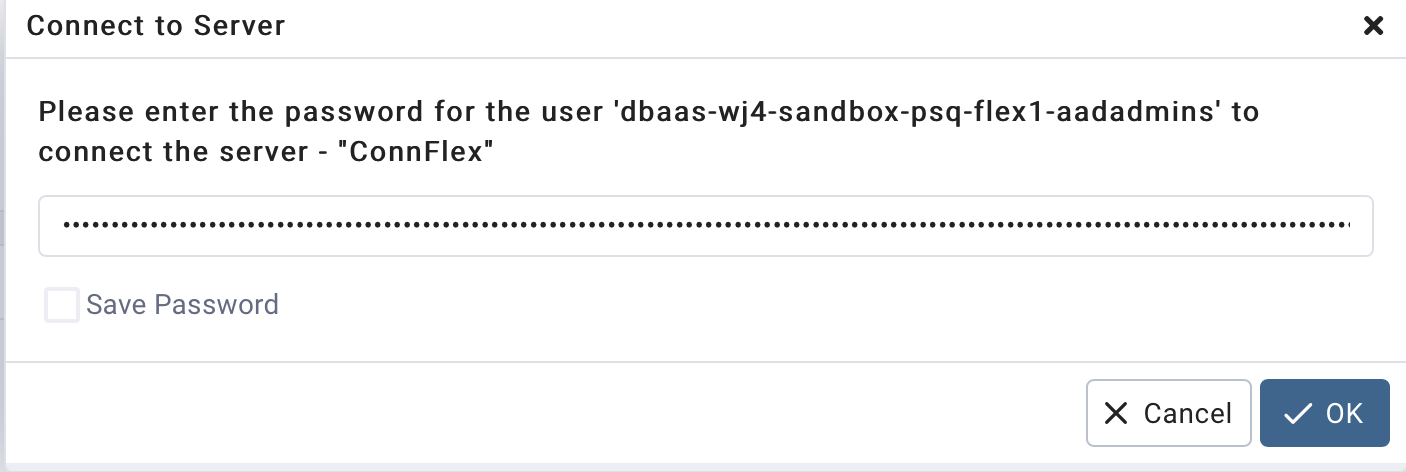
Now, right click on the server and select "Connect". you will be prompted for your token . How to get it
Enter the token as your password:
az account get-access-token --resource <https://ossrdbms-aad.database.windows.net>
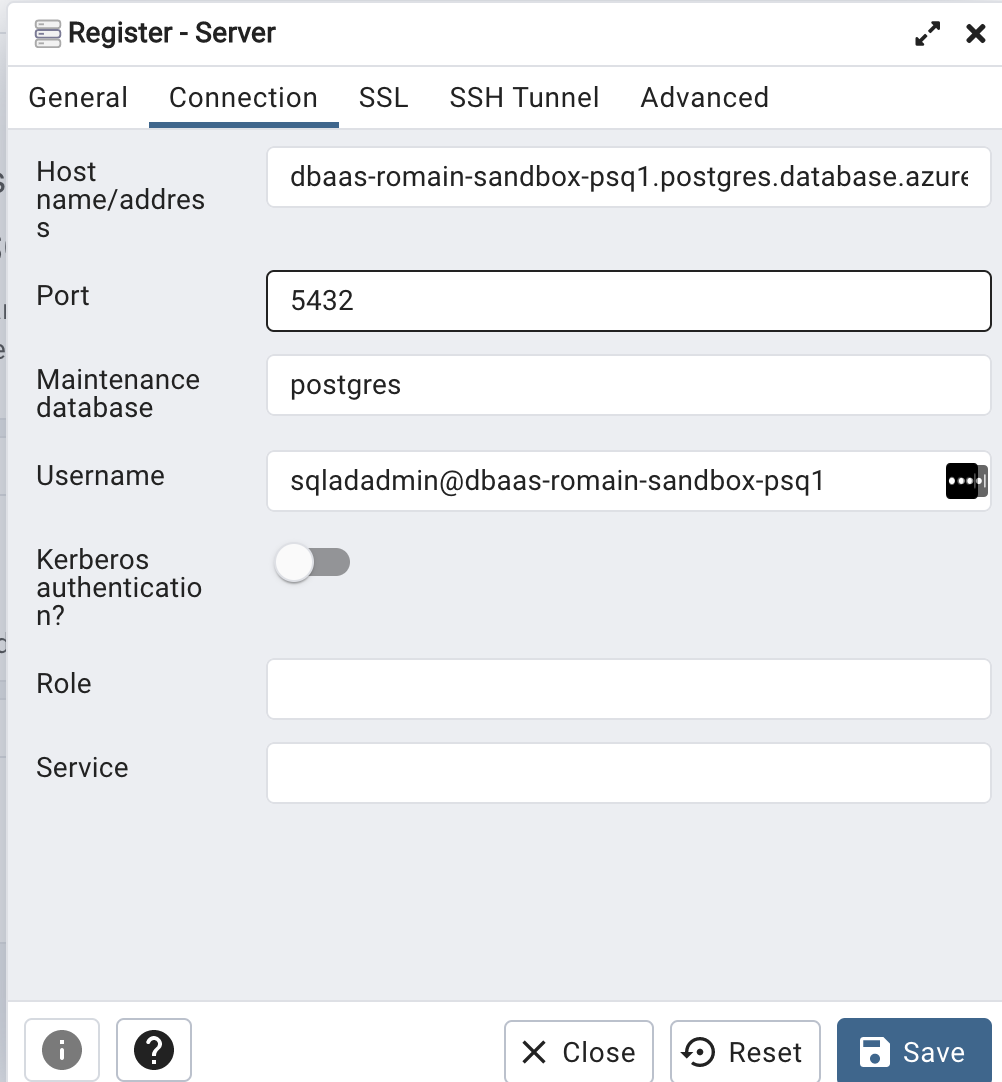
Host name : <your_instance>.postgres.database.azure.com # As seen in step1 ()
Port : 5432
Maintenance database: postgres
Username: sqladadmin@<your_instance>
In SSL Tab

SSL option MUST be "Required"
Then save your Server configuration
Now, right click on the server and select "Connect". you will be prompted for your token . How to get it

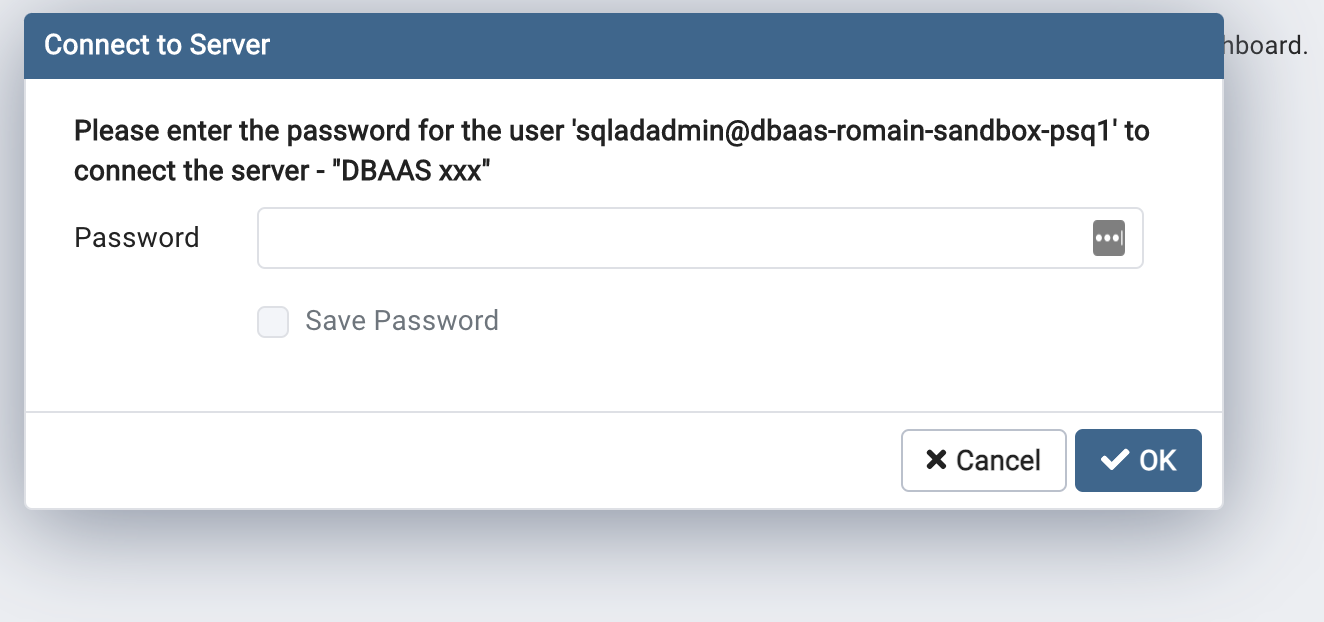
And now, you're connected !
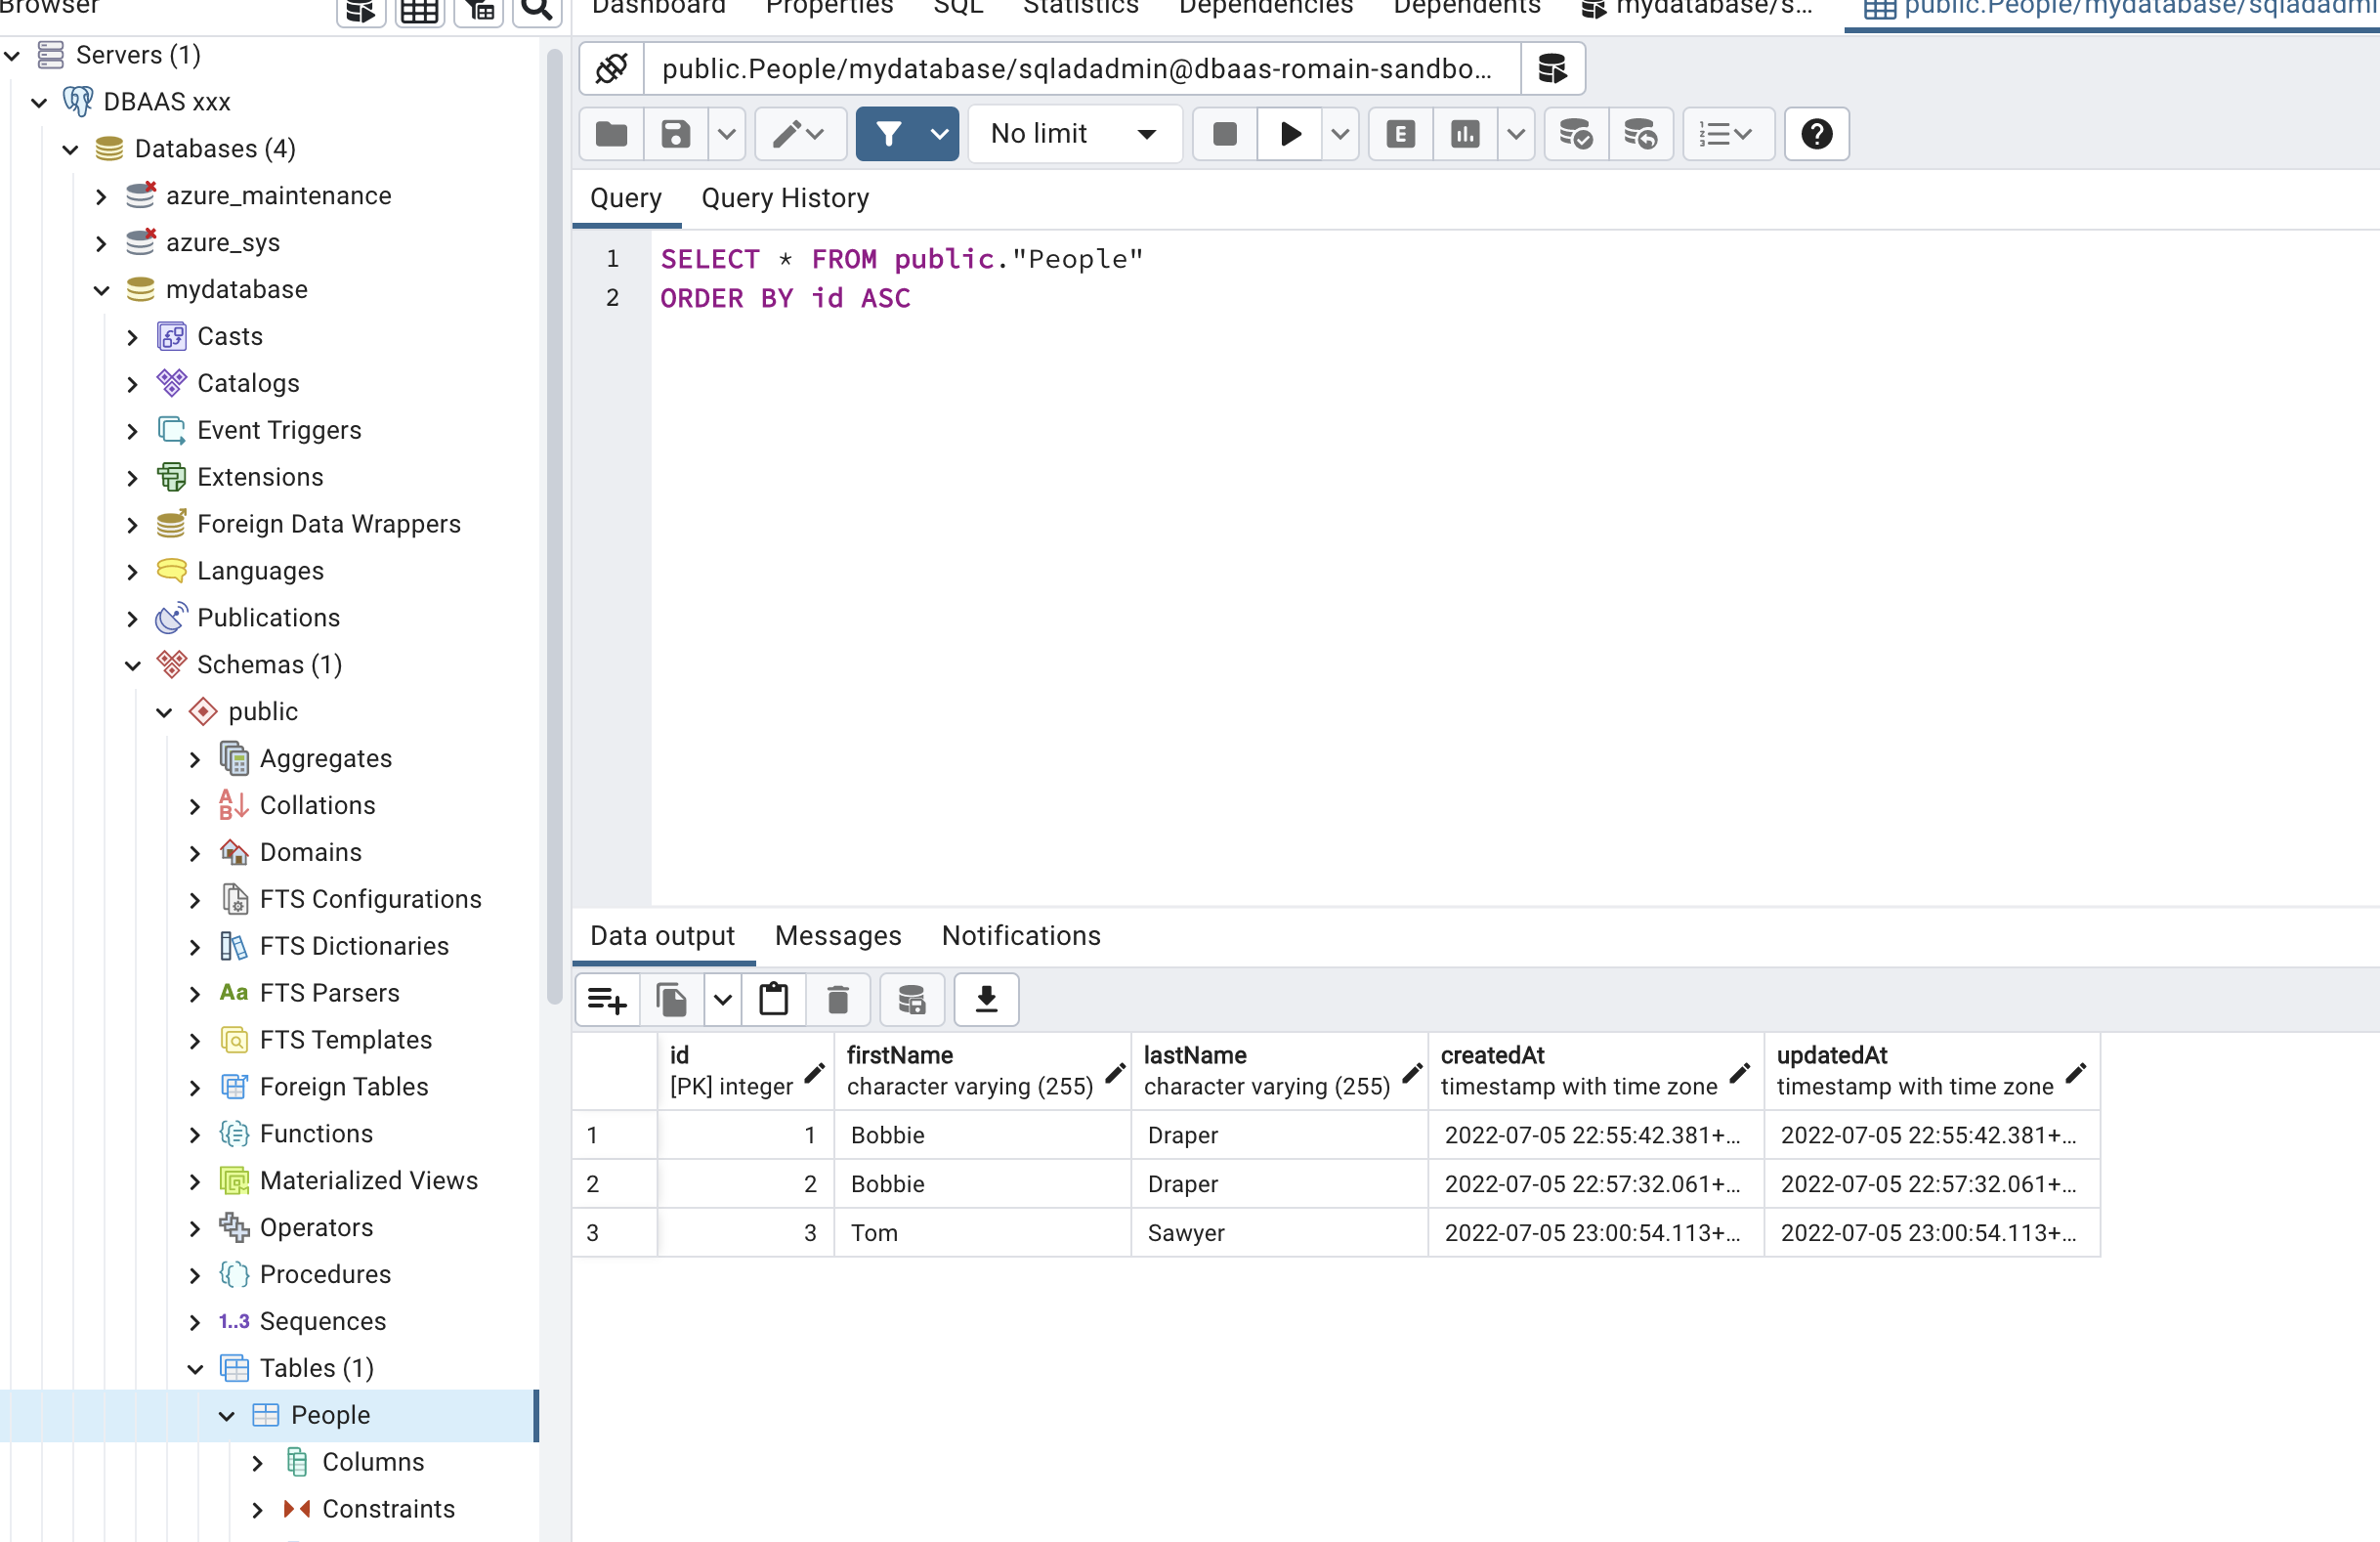
Tip ! If you connect with user mydatabaseuser and password acomplexpassword you can see the table "People" and users created before:
Appendix 1 : Install AZ Client
Please find documentation here
Appendix 2 : Install Postgres Client
Before you start
Before you start, you should confirm that you don’t already have psql installed. In fact, if you’ve ever installed Postgres or TimescaleDB before, you likely already have psql installed.
psql --version
Install on MacOS using Homebrew
First, install the Brew Package Manager
Second, update brew. From your command line, run the following commands:
brew doctor
brew update
brew install libpq
Finally, symlink psql (and other libpq tools) into /usr/local/bin:
brew link --force libpq
Install on Ubuntu 16.04,18.04 and Debian 9,10
Install on Ubuntu and Debian using the apt package manager:
sudo apt-get update
sudo apt-get install postgresql-client
Note: This only installs the psql client and not the PostgreSQL database.
Install Windows 10
We recommend using the installer from PostgreSQL.org
Last step: Connect to your PostgreSQL server
Let’s confirm that psql is installed:
psql --version
Troubleshooting section
I have enabled the Vnet integration in standard (ex: C2) but I do not have access from my K8SAAS instance: No answer
Example of Issue:
netshoot:~# curl dbaas-wbcht-prod-psql-flex1.postgres.database.azure.com:5432 - no response
Root cause: The naming resolution is not properly setup on K8SAAS.
In fact, when DBAAS instance is setup with VNET integration, the naming resolution is not public, so by default you can't resolve the URL of the DBAAS from internet. To do so, you should integrate the private DNS domain zone with the VNET of your environment (iaas lz, K8SAAS etc...).
If you face this issue, you should ask using a generic request to integrate the private DNS domain zone (which is mutualized) with your VNET. PLease provide the ID of your VNET, make sure the support has access to it + precise the URL used by your DBAAS instance
I have enabled the Vnet integration in standard (ex: C2) but I do not have access from my K8SAAS instance: timed out
Example of Issue:
netshoot:~# nc -zv -w 5 dbaas-TENANT_NAME-psql-flex1.postgres.database.azure.com 5432
nc: connect to dbaas-TENANT_NAME-psql-flex1.postgres.database.azure.com (DBAAS_IP) port 5432 (tcp) timed out: Operation in progress
Root cause: Even if your DNS resolution is properly setup (previous issue), you should have access to the TDP network backbone. If you face this issue, your environment is probably not connected to TDP Network Backbone. Do ask for it, please raise a request using Virtual Network Peering request
Please look at the VNET integration page. It describes how the integration works and the supported use cases.